A Tutorial: Achieving a Pure White Background In Your Jewelry Photography
In my quest to improve my jewelry photography, I've come to love the look of a pure white background. It’s such a professional, clean look and places all the focus
squarely on the jewelry itself. However, my pursuit in achieving this look with my own jewelry photos has proven more difficult than I first thought. Nevertheless, I was determined, and found that with some
patience along with trial and error (okay, a lot of trial and error), it’s possible.
In this tutorial, I'll be sharing information I've gathered from reading, watching webinars and then putting those bits of information to work. First, let me say I’m not a professional photographer by any stretch of the
imagination, but if you can read a manual, push some buttons and are skillful
in the use of tape (yes, tape), you can do this. In addition, this tutorial is not limited to jewelry but
also pertains to other items that require macro photography.
The Camera ~
 |
| Kodak Easy Share dx7590 |
The camera I use is a Kodak Easy Share dx7590; it's not a professional camera, but gets the job done. Depending on the brand of your camera, your particular settings may differ from mine. However, the references I provide will hopefully give you some idea
of where to start when making adjustments on your own camera. Please refer to
your particular cameras user manual and familiarize yourself with its
adjustable settings. If you’ve lost your owner’s manual, many are available
online and can be found with a simple search.
Camera settings you need to know:
 Macro
setting: most digital cameras can be set in the macro mode for “up close”
photography. This feature is usually indicated by a flower icon on all cameras (depicted on the left).
Macro
setting: most digital cameras can be set in the macro mode for “up close”
photography. This feature is usually indicated by a flower icon on all cameras (depicted on the left).
Manual
Mode: you'll want to put your camera in manual mode. This allows you to set
and adjust certain settings rather than rely on factory settings.
ISO:
This number indicates the cameras sensitivity to light; the higher the number,
the more noise your camera will capture. In other words, the brighter the light
you’re using, the lower the ISO should be and the darker the light you’re
using, the higher the ISO should be. As an analogy, if it's bright and sunny, you want to "close the shade" and if it's getting dark you want to "open the shades up". I have read that several professional jewelry photographers stick with an ISO 80 when using a light tent/box. This makes sense, because the photography light tent is very bright. I also use a light
box, so I’m going to use ISO 80 too (why mess with success).
Aperture or f-stop: This is the
opening that allows the light into the camera. This setting is prized by
jewelry photographers due to the control is allows for the exposure and depth
of field in your photos. A small aperture setting will make your entire jewelry
piece in focus, whereas a larger aperture will make the closest area of the
jewelry in focus while the background is blurred and dreamy looking. If you like this look, the
aperture setting can be used to give a more artistic touch to your photos. I
know most of you have seen those photos that are in focus and sharp in the
forefront, while being blurred and “dreamy” in the background and then wonder, "how did they do that?"; well, now you know. Set this on the
highest setting available on your camera in order to have your entire piece in
focus. If you like the “dreamy” look scale
this number back until you achieve the look you want. The highest my f-stop
will go is 8 but, a professional camera can be set at a much higher number (into the double or triple digits). Keep
in mind that the f-stop and the shutter speed work hand in hand. This means that
if you’re taking great pictures with your f-stop set on f8 and then decide to change
it to f4, you will need to adjust your shutter speed in order to achieve the
same picture quality you had at f8.
Shutter
Speed: The shutter speed is a measurement of how long the camera is allowing light to enter. It's used
in conjunction with the aperture to achieve good exposure.
Flash:
You will not be using the flash feature. I've never read or seen a professional suggest it or advise it. However, you will be using other bright light
sources that I’ll talk about later.
White
Balance: This is simply an adjustment that will make your item appear in “true”
or “real life” color. This is a setting that you may need to play around with,
if possible, depending on your lighting conditions. However, be aware that even
if something looks true to color on your computer monitor, not all monitors are
the same. For example, colors do not appear the same on my PC monitor as they
do on my laptop or my phone.
 Exposure
Compensation: If available on your camera, this is a setting where you can manually adjust the brightness of
your photos as you take them. This would be adjusted depending on your
background color and you would + the setting to lighten your image and – the
setting to darken your image.
Exposure
Compensation: If available on your camera, this is a setting where you can manually adjust the brightness of
your photos as you take them. This would be adjusted depending on your
background color and you would + the setting to lighten your image and – the
setting to darken your image.
Spot
Focus: If offered on your camera, it’s helpful to set the focus mode to “spot
focus”. This allows you to control what the camera is focusing on.
The Photography Light Box ~
Now that you’ve familiarized yourself with the settings
we’ll be using, let’s set up our photography area.
 |
| My basic photography setup |
I made a “photography light box” from
the box my computer came in (the inside was already white, yay!) The purpose
behind the light box or light tent is to provide an evenly distributed diffused light
that is bright, without causing a glare bouncing off your objects. You can
purchase simple and very elaborate set ups on line, but I decided to make my own. Watch for an upcoming tutorial on how I made mine.
However, in order to achieve the pure white background we'll need a few more items. What I'm about to show you is similar to something you can purchase at an art supply store and is referred to as an "artist tracing light box" or similar wording. Therefore, I'll refer to this tracing lightbox as an "illuminating box" in order to alleviate any confusion with the "photography lightbox".
 |
| A purchased version of an Artist Tracing Lightbox |
Illuminating Box Setup ~
The key is to use clear or frosted Plexiglass or another brand of acrylic such as Optix or Lexon. These are all the essentially the same products, just different brand names. This acrylic product is available in clear, clear frosted, black and a host of other colors. It also comes in different
thicknesses, which is not all that important. I purchased the one I thought
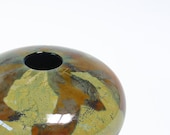
would be the most durable for my needs. For the pure white background you'll want the clear or clear frosted. But, I thought I'd show you a photo of how the black looks below.
 |
| Taken using black Plexiglass |
The black Plexiglass is available on line and will give
very dramatic reflections in your jewelry photography, sometimes referred to as
“black ice”. However, like I mentioned before, you'll want to get the frosted or clear for the pure white background.
Supplies Needed: (I found everything at Lowes, except the fabric interfacing)
> Plexiglass, Optix, Lexon or other brand of like product in
frosted or clear
> If using clear Plexi, enough vellum, interfacing or tracing paper to cover one side
> Tape; I used double sided sticky tape
> Two risers to set the Plexiglass on; they need to be at least 4” in height
> Flat, under the counter type light fixture 12-18” in length;
depending on the size of your box
> Two or more risers for the Plexiglass to sit on. I decided on two packages of wooden shims
> An under the counter type light in a length of 12-18”. These ranged in price from $9.97 for a clearance item up to one for $49.00. Needless to say, I opted for one priced $12.00 on clearance. *Note* be aware that the Halogen ones will get extremely hot and could be dangerous. I had a Halogen version one time and it melted the plastic cover over the bulbs and caused the light to short out.
The Lowes I went to doesn't carry the brand Plexiglass, but does have Optix and Lexon. I bought a pre-cut 8x10 section and I had them cut an 18x18 inch section at no extra charge. The interior of my photography box is 18
½" square so I wanted a section large enough to go from edge to edge. I bought the small piece too, because I wasn't sure what was going to work best and I didn't want to have to turn around and go back.
I was only able to get the clear Optix and Lexon, so I'll need vellum, interfacing or something similar to adhere to one side of the acrylic. I used a medium weight sew-in interfacing so I'd be able to have one solid piece to cover my 18x18" acrylic (interfacing comes in a 20" width and they will cut it any length you want). The reason for this backing is that you want to diffuse the light and don't want your underlight to show in your photos. If I’ve confused you, everything will become clear in a few minutes.
I’ll leave the packages of wood shims wrapped in their original plastic wrapping because they're the height I wanted, but I’ll wrap white computer
paper around them so everything remains white inside the light box. (This is where your taping skills come into play).
Also, attach vellum, interfacing or tracing paper to one side of your clear acrylic using tape. Your jewelry will be sitting directly on the Plexi so the
paper just needs to be on one side. Place your risers in the desired location and position your Plexi on top. Now you can slide your flat light under the acrylic. This under light will minimize shadows and eliminate reflections. The pictures below show my set up before and then after I put the new items in place.
The Photos~
Now it’s time to take some pictures! I’ve taken a series of
photos while making adjustments to achieve the look I want. With the white
background, you’ll want the white area a little overexposed but not your
item….this is a fine line, especially with certain colors, metals (such as un-oxidized sterling silver) and gemstones. So, it
pays off to play around with your settings in order to achieve your best
picture. Also, once you decide on certain settings for your test item, use those same settings to photograph other items to insure you're getting consistent results.
With each photo, I’ve included my camera settings so you can
see the difference and progression. This is what you'll want to do with your
camera, so you can compare your results and make adjustments as needed. You can
write down your settings as you go, or simply look at the photo properties in
your editing software if you lose track. These photos have NOT been edited
in any way. I've turned on all my normal light I use with my photography lightbox, along with my new underlight. The camera has remained in the same position and I’ve chosen this
vintage broach due to the bright silver and sparkle of the gemstones. Red,
white, clear and bright silver are difficult to photograph and adjustments may
need to be made when trying to capture these items. I’ve also found that I need
to re-adjust my camera if I photograph after dark because my results are not
the same. Remember, your goal is to take a picture that needs little to no editing to save yourself time.
>>Photos below are ISO80 with the aperture/ f-stop set on 4 (a little "dreamy"; refer to the fstop description above under "camera settings to know"). The
shutter speed is labeled with each photo. Again, the smaller the
number, the brighter the picture. Notice, the photo below with shutter speed set at 1/20 is overexposed and I'm losing the definition of my piece; see how the outside edges of the broach are disappearing.
 |
| The 1/40 shutter speed appears to be the best while the 1/80 is too dark and 1/20 is overexposed. |
>>Photos below are ISO80 with the aperture/ f-stop set on 8 (entire item in focus; refer to the fstop description above under "camera settings to know"). The shutter speed is labeled with each photo. Again, the smaller the number, the brighter the picture. Notice the photo below with the shutter speed at 1/10 is a nice white and I still have definition of my piece; you can still see all the edges of the broach. Yay! success!!!
 |
| The 1/10 shutter speed appears to be the best while the 1/30 and 1/20 are definitely too dark. |
Analysis ~
As you can see from the photos above, I’ve achieved my best results using the f-stop 8 with a shutter speed of 1/10 OR using the f-stop 4 with a shutter speed of 1/40. The difference in these photos will be that more of the item will be in
focus using the f8 while the f4 setting will produce a blurred/dreamy effect on the part of the item that's the farthest away from the lens. If you want more of a dreamy look, simply
lower the f-stop even more. However, keep in mind your shutter speed will need to
be adjusted accordingly.
Finishing Work ~
The following photo shows the edited version of the f8 1/10 image directly above. I simply used the clarity and crop functions in the Adobe Lightroom 4
software. The Clarity Function brings out the brilliance of the stones. Remember, you want to be able to take your photos with minimal editing needed in order to save yourself time. If you start with a photo that's underexposed, overexposed or out of focus, the best photo editing software in the country will not turn it into a good photo. I would suggest importing a few of your completed photos into a word document or on your own blog to see how they look. If the background is pure white, it will disappear on the document and your item will appear to float on the page (as seen in the photo below). I think it's also worth noting that you can download a 30 day free trial version of Lightroom 4 to "try before you buy".
In case you had been wondering if you really needed that underlight, I've taken a photo without it in order to compare. They are both taken with the setting f4 1/40. You can really see how that underlight helps in alleviating shadows/reflections and brightens the photo. However, if you want the item refection and like that look, simply adjust your shutter speed to a number lower than 40 and that will brighten the photo. Remember the photo I included above showing the stunning reflection achieved using the black Plexiglass? Well, you can achieve a less dramatic reflection using your frosted/clear Plexi and turning off your underlight.
Conclusion ~
Hopefully, this information will give you a few ideas with a
guideline of where to begin. Once you find your “zone”, you should be able to
leave your camera settings the same for most of your jewelry with only
occasional small adjustments needed for certain items or lighting situations.
Thank you for reading and I look forward to your comments or any photography
tips you might have.
Don’t forget to leave links so others can see your
results =)